Ingredients
The Base
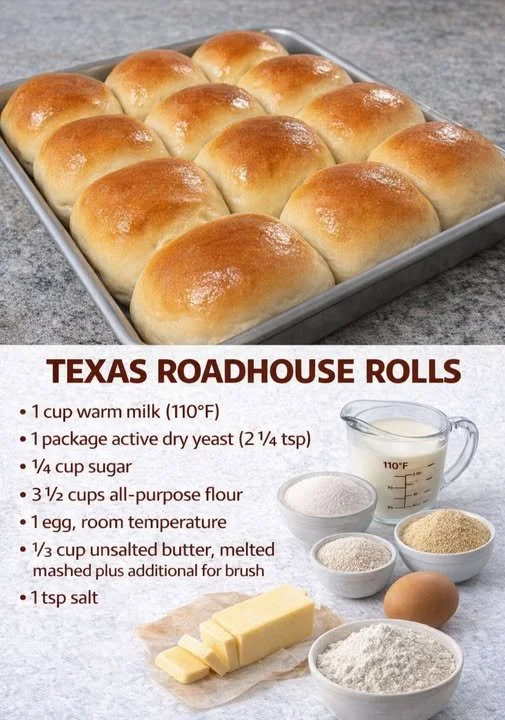
- 1 cup warm milk
- 3 1/2 cups all-purpose flour
- 1 egg
- 1/3 cup butter (melted)
- 2 tablespoons honey
The Yeast
- 2 1/4 teaspoons active dry yeast (about one packet)
- 1 teaspoon salt
Instructions on the next page 👇👇
Directions
-
Begin by combining the warm milk, honey, and yeast in a large bowl. Let it sit for 5-10 minutes until it becomes bubbly. This activation step is vital – the yeast needs that warmth to flourish, providing the rolls with their soft texture.
-
While the yeast mixture is coming to life, take another bowl to mix the flour and salt. This helps evenly distribute the salt throughout your flour, which is essential for flavor.
-
Once your yeast mixture is bubbly, add the melted butter and egg to it. Combine these wet ingredients thoroughly before gradually blending in the flour mixture. You’ll observe the dough taking shape, and as you do so, imagine the tremendous flavors waiting to develop.
-
On a floured surface, knead the dough until it becomes smooth and elastic. This step is critical; it builds gluten structure, which gives the rolls their signature chewiness and soft texture.
-
Next, place the kneaded dough into a greased bowl. Cover it with a clean cloth, and let it rise for approximately 1 hour or until it has doubled in size. This is where the magic happens as the yeast works its wonders.
-
Preheat your oven to 350°F (175°C). The timing of this step will ensure that your rolls are ready for baking as soon as they’re shaped.
-
Gently punch down the dough to remove excess air. Then divide the dough into small equal pieces and shape them into rolls. Place these rolls onto a baking sheet lined with parchment paper.
-
Allow the rolls to rise again for about 30 minutes. They will puff up beautifully, becoming lighter and airier, contributing to their tremendous quality after baking.
-
Bake the rolls in the preheated oven for 15-20 minutes. Keep an eye on them until they turn golden brown and exude a delightful aroma that fills your kitchen.
-
Once baked, remove the rolls from the oven and brush them with melted butter for an additional touch of richness before serving. The buttery glaze will add an irresistible shine and flavor, elevating the experience.
Continue reading on the next page 👇👇
Pro Tips for Success
Kneeing
-
Knead Until Smooth: The dough needs to be kneaded well to develop proper gluten. Aim for about 5-10 minutes until it’s soft and smooth.
-
Flour Sparingly: Avoid adding too much flour while kneading, as this can make the rolls tough. A light dusting is sufficient.
-
Use the Windowpane Test: To check if your dough is kneaded enough, stretch a small piece. If it forms a thin, translucent membrane, you’re good to go.
Rising
-
Warm Environment: If your kitchen is cool, create a warm spot for the dough. An oven with the light on can offer a perfect environment for rising.
-
Cover Well: Ensure the dough is covered with a damp cloth or plastic wrap to retain moisture, which prevents it from forming a crust.
-
Don’t Rush: Allow the dough to rise until it has truly doubled in size. This can lead to a more tender and fluffy roll.
Baking
-
Even Spacing: When placing the rolls on the baking sheet, ensure they are evenly spaced. This encourages even baking and browning.
-
Brush Early: For extra flavor, consider brushing some melted butter over the rolls just after they come out of the oven.
-
Keep an Eye: Oven temperatures can vary, so watch the rolls closely towards the end of the baking time to prevent over-browning.
Storage and Freshness
Storage
-
Cool Completely: Always allow the rolls to cool completely before storing them to prevent moisture buildup that can make them soggy.
-
Airtight Container: Store leftover rolls in an airtight container or sealed plastic bag to keep them fresh.
-
Freezing: For longer storage, freeze the rolls in a single layer, then transfer to a freezer bag. They’ll last for up to 3 months.
Reheating
-
Oven Method: To enjoy that fresh-baked flavor, reheat frozen rolls in a 350°F (175°C) oven for about 10 minutes.
-
Microwave Warning: While handy, using a microwave can make the rolls chewy. If you use this method, heat them in short bursts.
Freshness
-
Check Before Use: Always check for any signs of spoilage like off smells or unusual textures to ensure your rolls are still good to eat.
-
Daily Use: Homemade rolls are best consumed within a couple of days, but properly stored, they can last longer.
Final Thoughts
Crafting Texas Roadhouse Rolls in your own kitchen is not just about nourishing the body, but also about feeding the soul. The tremendous joy that these rolls can bring to your dining experience is undeniable. Each nibble of this soft and buttery goodness has the power to evoke memories of family gatherings, pleasant conversations, and the simple pleasure of sharing food.
As you embark on this delightful journey of baking, I recommend sharing these rolls with friends and family. There’s nothing quite like a warm roll in the hands of a loved one. Have you ever tried making rolls at home? What is the special twist you might add to make them your own?