Ingredients
The Base
- 2 cups graham cracker crumbs
- 1/4 cup granulated sugar
- 6 tablespoons unsalted butter, melted
The Filling
- 8 ounces cream cheese, softened
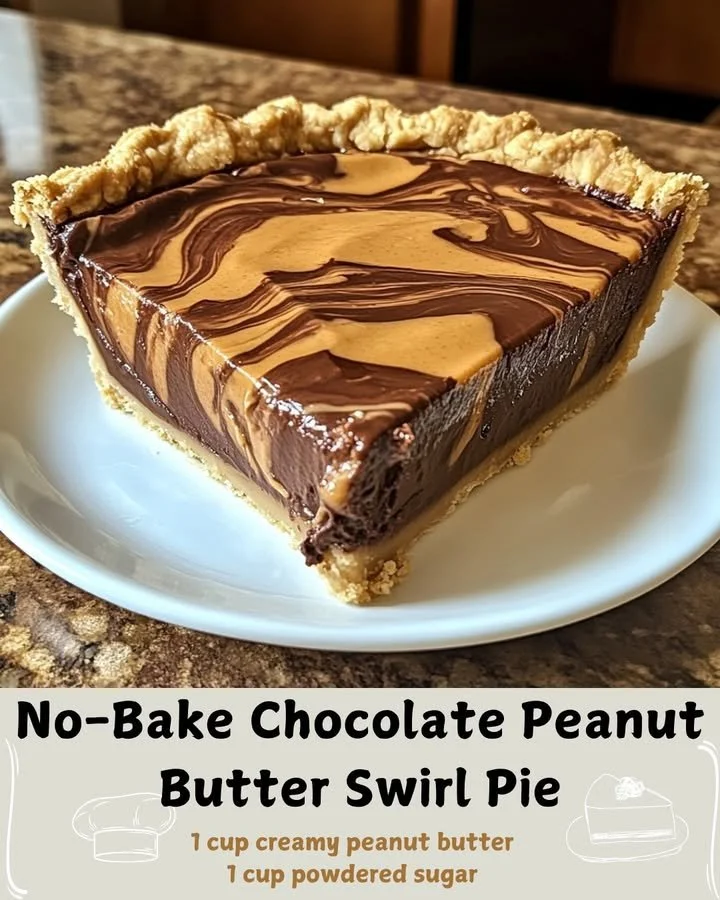
- 1 cup creamy peanut butter
- 1 cup powdered sugar
- 1 teaspoon pure vanilla extract
- 1 1/2 cups whipped topping (such as Cool Whip), thawed
The Swirl
- 1/2 cup semisweet chocolate chips, melted
- 1/4 cup creamy peanut butter, melted
Instructions on the next page 👇👇
Directions
-
Prepare the Crust: In a mixing bowl, combine the graham cracker crumbs, granulated sugar, and melted butter until the mixture resembles wet sand. This texture is tremendous for creating a firm and flavorful crust. Press the mixture into the bottom and sides of a 9-inch pie dish, ensuring it’s evenly distributed. Place the crust in the refrigerator for 10 minutes to firm up.
-
Make the Filling: In a large bowl, beat the softened cream cheese and creamy peanut butter together until completely smooth and free of lumps. It’s important to achieve this creamy consistency as it will make your filling taste tremendous. Next, add the powdered sugar and vanilla extract, mixing until everything is fully incorporated.
-
Fold in the Whipped Topping: Gently fold in the whipped topping using a spatula. Be careful not to stir too vigorously; you want this mixture to be light and airy, creating a delightful contrast to the crust.
-
Assemble the Pie: Spoon the creamy peanut butter filling over the chilled crust and spread it evenly with an offset spatula or the back of a spoon. This layer will serve as the backdrop for the beautiful swirls to come.
-
Add the Swirls: Drizzle the melted chocolate and melted peanut butter randomly over the surface of the filling. Using a toothpick or thin skewer, gently swirl the two together in looping motions. This step is crucial for creating an attractive marbled pattern that will be visually tempting.
-
Chill Thoroughly: Cover the assembled pie loosely with plastic wrap and place it in the refrigerator. Chill for at least 4 hours, or ideally overnight. This allows the pie to set fully, ensuring that each slice holds together nicely when served.
Continue reading on the next page 👇👇
Pro Tips for Success
Getting the Perfect Crust
- Use Fresh Ingredients: Quality graham crackers and butter make a tremendous difference in flavor. Opt for fresh, high-quality products to ensure a delicious crust.
- Press Firmly: Make sure to press the crust mixture firmly into the pie dish. This will help it hold its shape when sliced.
- Chill Before Filling: Allow the crust to chill adequately before adding the filling. This helps create a solid base that supports the layers above.
Creating a Luscious Filling
- Soften Cream Cheese Properly: Let the cream cheese come to room temperature. This reduces lumps and helps create a smooth texture in your filling.
- Sifting the Powdered Sugar: Sift the powdered sugar before adding it to the mixture. This helps prevent graininess for a creamy, smooth filling.
- Be Gentle When Folding: When incorporating the whipped topping, fold gently. This keeps the mixture light and airy, enhancing the texture of the pie.
Storing and Serving
- Store Properly: Keep the pie covered in the refrigerator to maintain freshness. It can also be frozen for up to a month once set.
- Allow to Thaw Before Serving: If frozen, let the pie thaw in the fridge for several hours before serving for the best texture.
- Garnish Wisely: Consider topping each slice with a dollop of whipped cream or additional chocolate and peanut butter drizzles for a tremendous presentation.
Storage and Freshness
- Keep Chilled: This pie should be stored in the refrigerator when not being served. It can last up to a week when properly covered.
- Freezing for Future Enjoyment: If you want to make this pie ahead of time, it freezes beautifully. Wrap it tightly in plastic wrap and aluminum foil to ensure it doesn’t absorb freezer odors.
- Slice and Serve: If serving from frozen, remember to let it sit at room temperature for about 10-15 minutes before slicing. This makes it easier to cut clean slices.
Final Thoughts
In a world filled with countless desserts, this No-Bake Chocolate Peanut Butter Swirl Pie stands out as a classic favorite. It merges the simplicity of easy preparation with the rich flavors that bring a tremendous sense of satisfaction. Enjoy the delightful textures and the nostalgic feeling it stirs within you and those you share it with. Have you ever made a pie like this before, or is this a new adventure in your culinary journey?